
這次較長篇的動手做自己的智能家電終於迎來第一階段的完結了!
今天我們會講解完第一款以iPhone與Arduino自製的聊天器進行互動聊天
目標就是讓自己輸入的字回傳回來! (ex: iPhone內輸入 width , arduino會回傳width)
(小編知道這樣有點空虛....不過, 萬事起頭難吧!!)
接下來我們就繼續看下去吧!
今天我們會講解完第一款以iPhone與Arduino自製的聊天器進行互動聊天
目標就是讓自己輸入的字回傳回來! (ex: iPhone內輸入 width , arduino會回傳width)
(小編知道這樣有點空虛....不過, 萬事起頭難吧!!)
接下來我們就繼續看下去吧!
這篇內容稍微有點深, 第一次來板上的朋友請先注意我們使用的器材是
1. Arduino Atmega 2560 (參考DIY動手做系列文章: 購買篇 與 驅動篇)
2. BLE Shield (參考DIY動手做系列文章: BLE Shield簡介)
3. CoreBluetooth frameWork (參考Gossi! iOS Develop: Corebluetooth 簡介)
本篇文章完成時, 各位應該可以跟小編一樣看到一樣的畫面
接下來就要真正進入開發階段了!
先請各位到這個網址: https://github.com/RedBearLab/BLEShield
1. Arduino Atmega 2560 (參考DIY動手做系列文章: 購買篇 與 驅動篇)
2. BLE Shield (參考DIY動手做系列文章: BLE Shield簡介)
3. CoreBluetooth frameWork (參考Gossi! iOS Develop: Corebluetooth 簡介)
本篇文章完成時, 各位應該可以跟小編一樣看到一樣的畫面
接下來就要真正進入開發階段了!
先請各位到這個網址: https://github.com/RedBearLab/BLEShield
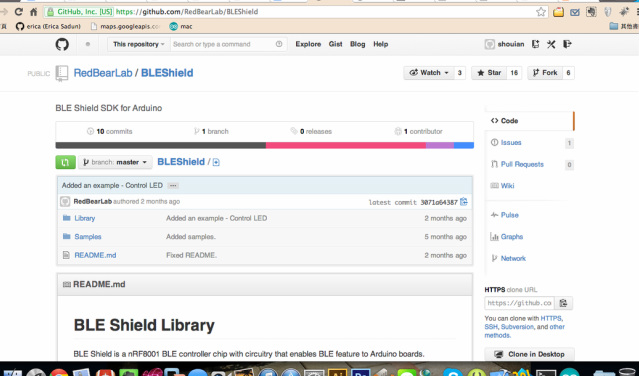
這邊同樣是由Red Bear所開發出來的framework, 包含了iOS簡易的framework
以及arduino的sample code
我們這次的主題也是從這裡修改而來的!
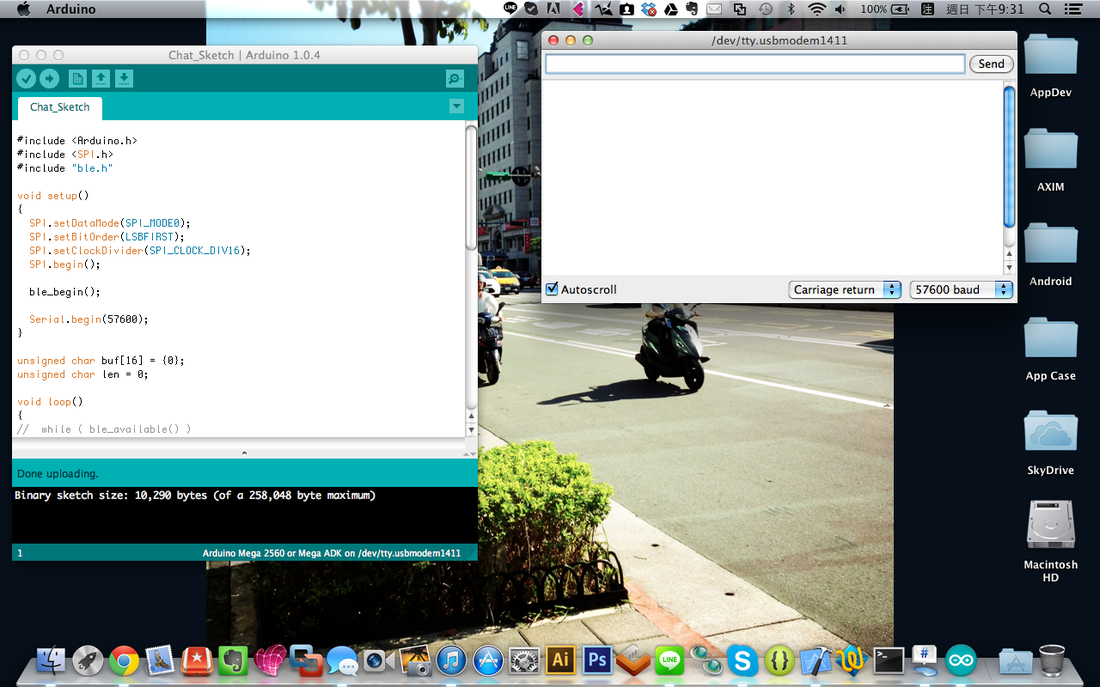
先看到我們的arduino code如下
新建一個arudino專案名稱如下
Chat_Sketch.ino
以及arduino的sample code
我們這次的主題也是從這裡修改而來的!
先看到我們的arduino code如下
新建一個arudino專案名稱如下
Chat_Sketch.ino
#include <Arduino.h>
#include <SPI.h>
#include "ble.h"
void setup()
{
SPI.setDataMode(SPI_MODE0);
SPI.setBitOrder(LSBFIRST);
SPI.setClockDivider(SPI_CLOCK_DIV16);
SPI.begin();
ble_begin();
Serial.begin(57600);
}
unsigned char buf[16] = {0};
unsigned char len = 0;
void loop()
{
while (ble_available()){
unsigned char c = ble_read();
Serial.write(c);
buf[len++] = c;
}
for (int i = 0; i < len; i++)
ble_write(buf[i]);
len = 0;
ble_do_events();
}
ble.h 以及Arduino.h兩個標頭檔的使用, 請參考 DIY動手做 藍芽模組教學
有關於arduino BLE開發所需要的詳細的設定說明!
這次在load程式以前, 請務必注意以下兩項設定:
(1) 開啓你的Serial Monitor
(2) 調整Serial Monitor的設定為:
-Carriage return
-57600 baud rate
開啓Serial Monitor的位置如下:
有關於arduino BLE開發所需要的詳細的設定說明!
這次在load程式以前, 請務必注意以下兩項設定:
(1) 開啓你的Serial Monitor
(2) 調整Serial Monitor的設定為:
-Carriage return
-57600 baud rate
開啓Serial Monitor的位置如下:
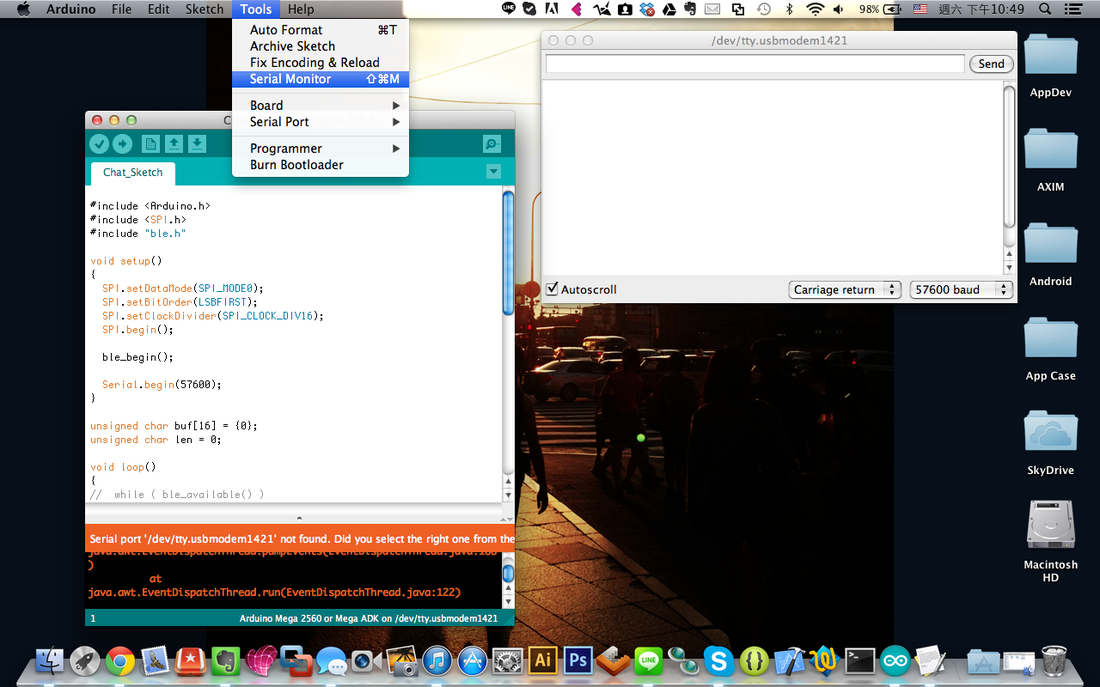
這邊小編要特別提醒!!
如果沒把arduino 插上去電腦, 是不能打開Serial Monitor的喔!
使用時請特別注意!
這裡我們簡單解釋一下arduino端的程式碼:
setup部分
(1) 前面四行SPI的程式碼在設定SPI pin腳位的數值 (這邊我們先不談細節, 例如什麼是SPI)
(2) ble_begin(). 用來初始化BLE framework的函式庫, 這行很重要千萬不能忘記
(3) 設定Serial Monitor的baud rate 為57600
loop部分
(1) while ble_avaiable() ... -> 代表有收到寫入藍牙的資訊
從外部傳到arduino的封包一旦結束就會跳離while迴圈
(2) arduino 這邊寫入的方式是: 1次1個字元character, 用ble_read()來接
(3) Serial.write 會把字元c寫到serial monitor 上
最後用一個陣列buf記錄起來每一個字元c, 就會形成一個原本輸入的字串了!
(4) 離開while迴圈後, 我們在用for 迴圈把每一個字元c 寫出去用ble_write()就可以把字元傳出去給iPhone囉!
(5) 把len歸為0, 下一次進入loop後重新從0開始記錄字元
(6) 最後ble_do_events(); 完成藍芽一次的傳輸行為
到這邊我們總算把外部藍芽設備(peripheral)端的程式碼寫完了!
接下來就是要開始寫iOS Xcode專案了!
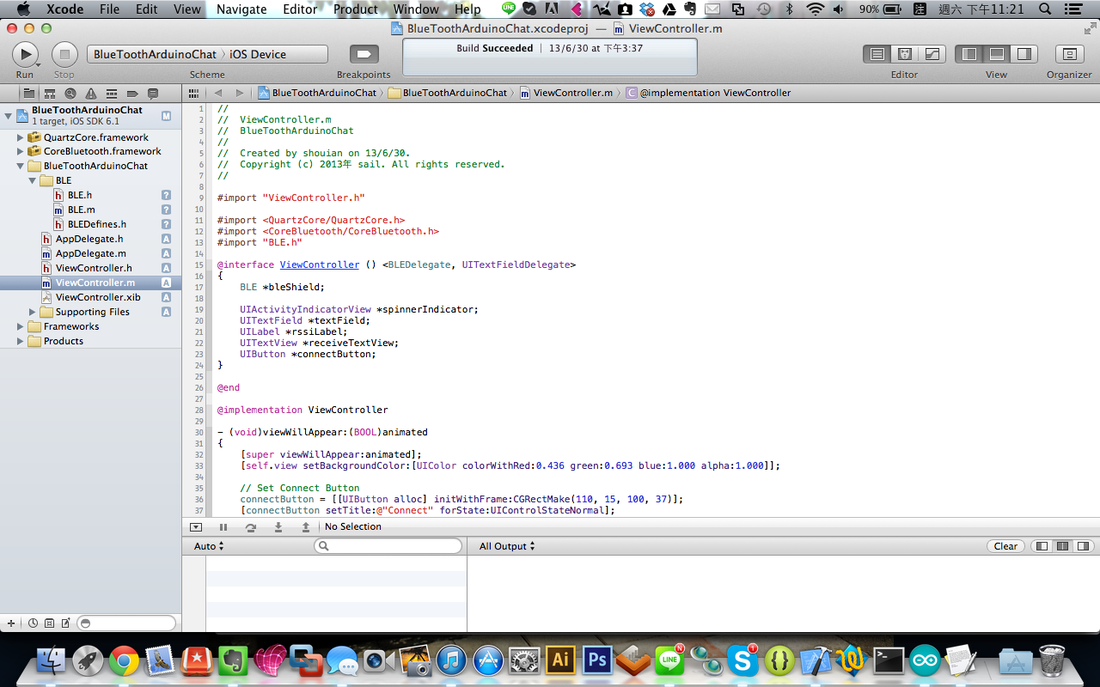
我們這次新建一個專案叫做BluetoothArduinoChat
這次也是使用ARC建成的專案喔!!!
新建成的專案架構跟下圖一樣
如果沒把arduino 插上去電腦, 是不能打開Serial Monitor的喔!
使用時請特別注意!
這裡我們簡單解釋一下arduino端的程式碼:
setup部分
(1) 前面四行SPI的程式碼在設定SPI pin腳位的數值 (這邊我們先不談細節, 例如什麼是SPI)
(2) ble_begin(). 用來初始化BLE framework的函式庫, 這行很重要千萬不能忘記
(3) 設定Serial Monitor的baud rate 為57600
loop部分
(1) while ble_avaiable() ... -> 代表有收到寫入藍牙的資訊
從外部傳到arduino的封包一旦結束就會跳離while迴圈
(2) arduino 這邊寫入的方式是: 1次1個字元character, 用ble_read()來接
(3) Serial.write 會把字元c寫到serial monitor 上
最後用一個陣列buf記錄起來每一個字元c, 就會形成一個原本輸入的字串了!
(4) 離開while迴圈後, 我們在用for 迴圈把每一個字元c 寫出去用ble_write()就可以把字元傳出去給iPhone囉!
(5) 把len歸為0, 下一次進入loop後重新從0開始記錄字元
(6) 最後ble_do_events(); 完成藍芽一次的傳輸行為
到這邊我們總算把外部藍芽設備(peripheral)端的程式碼寫完了!
接下來就是要開始寫iOS Xcode專案了!
我們這次新建一個專案叫做BluetoothArduinoChat
這次也是使用ARC建成的專案喔!!!
新建成的專案架構跟下圖一樣
你所需要做的步驟如下:
1. import Quartzcore framework (這個我們只是用來導圓角作效果的, 版友可依據需求決定是否要加)
2. import Corebluetooth framework (這個的重要性我想不用我多說了....)
3. import BLE.h, BLE.m, BLEDefines.h
(這些可以在RedBear 在上面github所放的內容中找到,
但是因為這邊我們有微幅調整他程式內一些會造成使用上混亂的情形,
一兩個method有被我們更動, 有需傲的可以在文章最後面看到下載連結!)
我們這次只在ViewController 內寫完所有動作以及UI的產生
版友最後會看到的畫面應當如下:
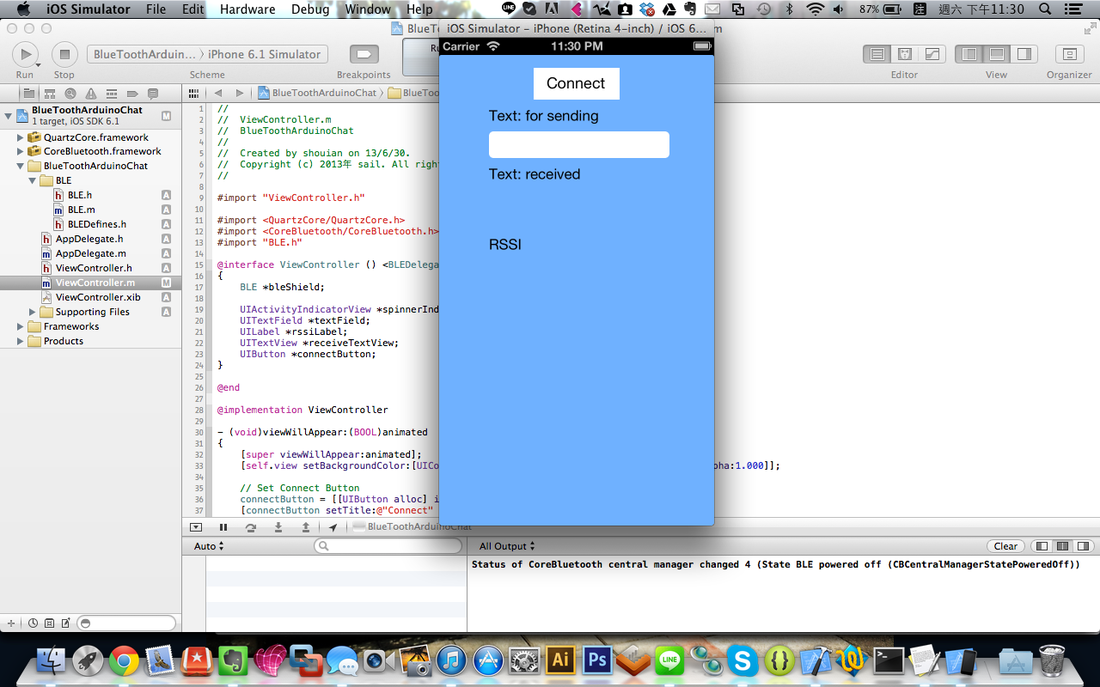
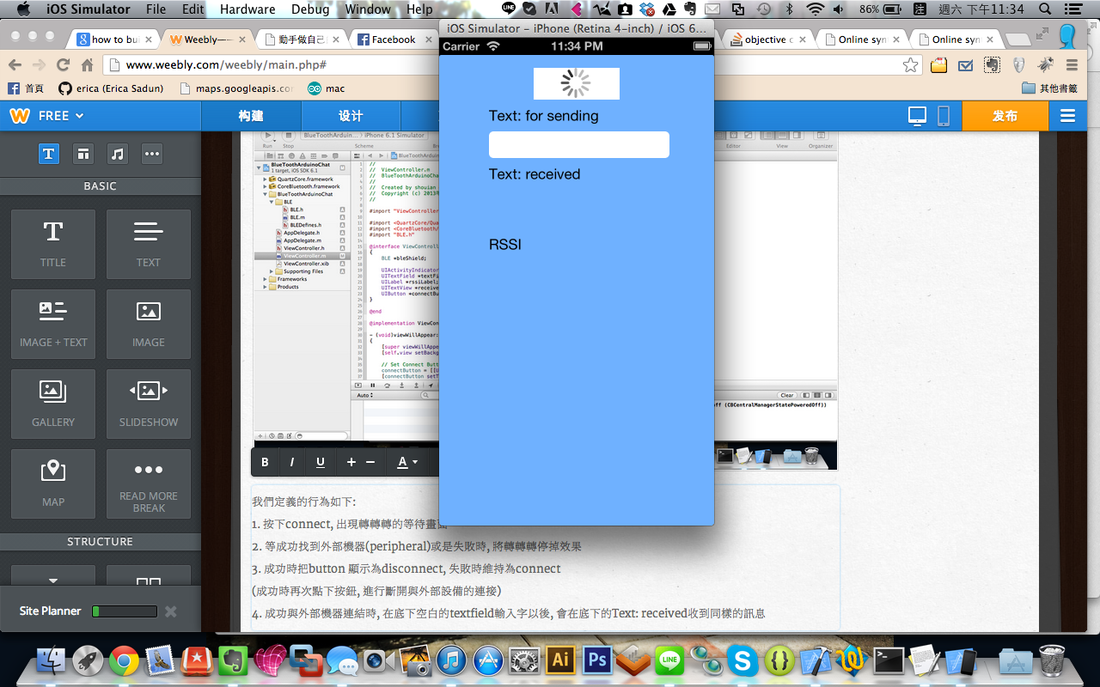
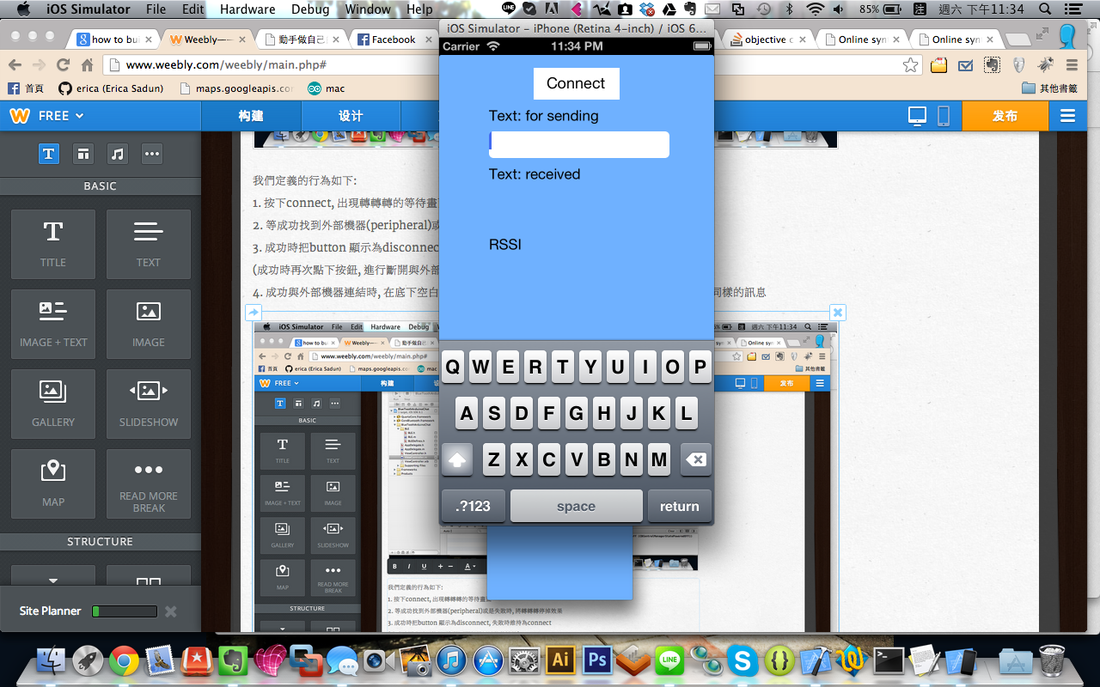
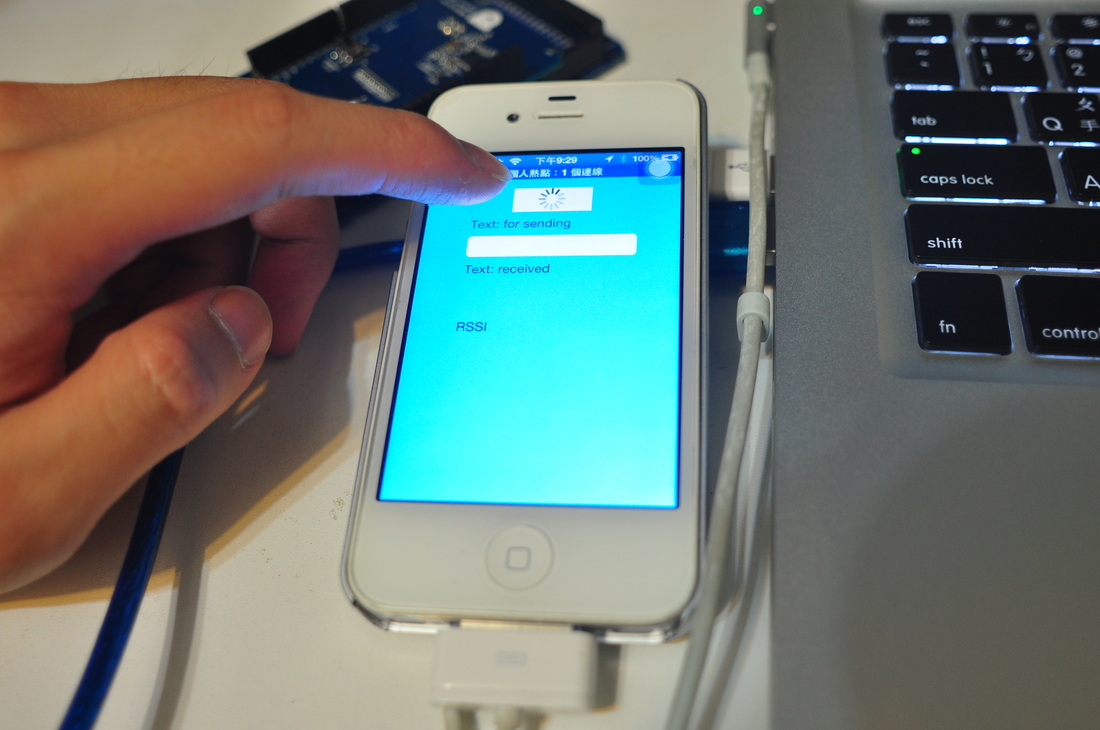
我們定義的行為如下:
1. 按下connect, 出現轉轉轉的等待畫面
2. 等成功找到外部機器(peripheral)或是失敗時, 將轉轉轉停掉效果
3. 成功時把button 顯示為disconnect, 失敗時維持為connect
(成功時再次點下按鈕, 進行斷開與外部設備的連接)
4. 成功與外部機器連結時, 在底下空白的textfield輸入字以後, 會在底下的Text: received收到同樣的訊息
同時在送出時把textfield內的字串給清空
1. 按下connect, 出現轉轉轉的等待畫面
2. 等成功找到外部機器(peripheral)或是失敗時, 將轉轉轉停掉效果
3. 成功時把button 顯示為disconnect, 失敗時維持為connect
(成功時再次點下按鈕, 進行斷開與外部設備的連接)
4. 成功與外部機器連結時, 在底下空白的textfield輸入字以後, 會在底下的Text: received收到同樣的訊息
同時在送出時把textfield內的字串給清空
轉轉轉的等待效果
接下來我們就要開始介紹整段程式的運作以及ble framework如何幫我們進行藍芽設備的溝通.
首先在ViewController.m檔案最上面一層
輸入以下程式碼:
首先在ViewController.m檔案最上面一層
輸入以下程式碼:
#import "ViewController.h"
#import <QuartzCore/QuartzCore.h>
#import <CoreBluetooth/CoreBluetooth.h>
#import "BLE.h"
@interface ViewController () <BLEDelegate, UITextFieldDelegate>
{
BLE *bleShield;
UIActivityIndicatorView *spinnerIndicator;
UITextField *textField;
UILabel *rssiLabel;
UITextView *receiveTextView;
UIButton *connectButton;
}
@end
我們只需要import
BLE.h
QuartzCore
Corebluetooth 三個framework
ViewController部分,
最重要的是要去承接BLEDelegate才能進行這次的範例喔!!!
BLEDelegate包含了與藍芽外部設備互動的協定,
要注意的是它是由RedBear 提供的library, 應用在其它藍芽設備時未必可直接喔!
(其實重點在於BLEDefine.h所定義的service type 現在只能支援BLE Shield的serivce type
未來小編也會提供類似的藍芽框架上來, 把彈性給拉高! )
我們首先宣告幾個全域變數在ViewController內
1. BLE *bleShield 代表這次的藍牙通訊物件實體
2. UI面原件作為interact 用的 (後面會有詳細介紹)
接下來我們就進一步介紹這次的iOS程式細節囉!
@implementation ViewController
- (void)viewDidLoad
{
[super viewDidLoad];
// Do any additional setup after loading the view, typically from a nib.
bleShield = [[BLE alloc] init];
[bleShield controlSetup];
bleShield.delegate = self;
}
- (void)viewWillAppear:(BOOL)animated
{
[super viewWillAppear:animated];
[self.view setBackgroundColor:[UIColor colorWithRed:0.436 green:0.693 blue:1.000 alpha:1.000]];
// Set Connect Button
connectButton = [[UIButton alloc] initWithFrame:CGRectMake(110, 15, 100, 37)];
[connectButton setTitle:@"Connect" forState:UIControlStateNormal];
[connectButton addTarget:self action:@selector(beginToScanPeripheral:) forControlEvents:UIControlEventTouchUpInside];
[connectButton setTitleColor:[UIColor blackColor] forState:UIControlStateNormal];
[connectButton setBackgroundColor:[UIColor whiteColor]];
[self.view addSubview:connectButton];
// Set Sending label
UILabel *textSendLabel = [[UILabel alloc] initWithFrame:CGRectMake(58, 60, 150, 21)];
[textSendLabel setText:@"Text: for sending"];
[textSendLabel setBackgroundColor:[UIColor clearColor]];
[self.view addSubview:textSendLabel];
// Setup textfield
textField = [[UITextField alloc] initWithFrame:CGRectMake(58, 89, 210, 31)];
[textField.layer setCornerRadius:5.0f];
[textField setBackgroundColor:[UIColor whiteColor]];
[textField setDelegate:self];
[textField setClearButtonMode:UITextFieldViewModeWhileEditing];
[self.view addSubview:textField];
// Set receiving label
UILabel *textReceiveLabel = [[UILabel alloc] initWithFrame:CGRectMake(58, 128, 150, 21)];
[textReceiveLabel setText:@"Text: received"];
[textReceiveLabel setBackgroundColor:[UIColor clearColor]];
[self.view addSubview:textReceiveLabel];
// Set receiving Text
receiveTextView = [[UITextView alloc] initWithFrame:CGRectMake(58, 160, 150, 30)];
[receiveTextView setBackgroundColor:[UIColor clearColor]];
receiveTextView.editable = NO;
receiveTextView.font = [UIFont fontWithName:@"Arial" size:[UIFont systemFontSize]];
[self.view addSubview:receiveTextView];
// Set receiving RSSI signal
UILabel *rssi = [[UILabel alloc] initWithFrame:CGRectMake(58, 200, 100, 40)];
[rssi setText:@"RSSI"];
[rssi setBackgroundColor:[UIColor clearColor]];
[self.view addSubview:rssi];
rssiLabel = [[UILabel alloc] initWithFrame:CGRectMake(58, 240, 100, 40)];
[rssiLabel setBackgroundColor:[UIColor clearColor]];
[self.view addSubview:rssiLabel];
// Set up activityindicator view
spinnerIndicator = [[UIActivityIndicatorView alloc] initWithActivityIndicatorStyle:UIActivityIndicatorViewStyleWhiteLarge];
[spinnerIndicator setColor:[UIColor blackColor]];
[spinnerIndicator setHidesWhenStopped:YES];
[spinnerIndicator setCenter:CGPointMake(CGRectGetWidth(connectButton.frame)/2, CGRectGetHeight(connectButton.frame)/2)];
[connectButton addSubview:spinnerIndicator];
}
- (void)didReceiveMemoryWarning
{
[super didReceiveMemoryWarning];
// Dispose of any resources that can be recreated.
}
首先要先初始化BLE Shield的物件
這三段函式就是初始化的步驟:
bleShield = [[BLE alloc] init];
[bleShield controlSetup];
bleShield.delegate = self;
[bleShield controlSetup] 會把BLE物件內的一個CBCentralManger給初始化
(這個CBCentralManger是在BLE的class內名為CM的property)
原本github的版本上還要輸入一個timeout, 但是因為原本的method內並沒有使用到該參數
所以我們修正掉此method 避免讀者混亂!
其實上面基本上都是設定UI的行為
我們重點的核心只在這一行, connectButton就是最上層連接的button
[connectButton addTarget:self action:@selector(beginToScanPeripheral:) forControlEvents:UIControlEventTouchUpInside];
beginToScanPeripheral:就是定義搜尋外部設備的Method
接下來我們將會仔細介紹每個行為...
#pragma mark - UIAction
- (void)beginToScanPeripheral:(id)sender
{
if (bleShield.activePeripheral) {
if (bleShield.activePeripheral.isConnected) {
[[bleShield CM] cancelPeripheralConnection:[bleShield activePeripheral]];
return;
}
}
if (bleShield.peripherals) {
bleShield.peripherals = nil;
}
[bleShield findBLEPeripherals:5]; // Timeout: 5 seconds
[NSTimer scheduledTimerWithTimeInterval:5.0f target:self selector:@selector(connectToBLETimer:) userInfo:nil repeats:NO];
[spinnerIndicator startAnimating];
[connectButton setTitle:@"" forState:UIControlStateNormal];
}
#pragma mark - Timer Action
- (void)connectToBLETimer:(NSTimer *)timer
{
[spinnerIndicator stopAnimating];
if (bleShield.peripherals.count > 0) {
// Connect to the first peripheral
[bleShield connectPeripheral:[bleShield.peripherals objectAtIndex:0]];
[connectButton setTitle:@"Disconnect" forState:UIControlStateNormal];
} else {
[connectButton setTitle:@"Connect" forState:UIControlStateNormal];
}
}
我們這邊的邏輯是
按下connect button後
if (bleShield.activePeripheral) {
if (bleShield.activePeripheral.isConnected) {
[[bleShield CM] cancelPeripheralConnection:[bleShield activePeripheral]];
return;
}
}
....
[bleShield findBLEPeripherals:5]; // Timeout: 5 seconds
[NSTimer scheduledTimerWithTimeInterval:5.0f target:self selector:@selector(connectToBLETimer:) userInfo:nil repeats:NO];
[spinnerIndicator startAnimating];
1. 會先判斷有沒有正在運作的外部設備, 有的話會用cancelPeripheralConnection:的method斷開與外部設備的連結
2. BLE Class內有一個method => findBLEPeripherals: 會去尋找外部設備, 設定timeout時間為5秒
(這邊要注意的是, findBLEPeripherals: 是實作我們在CoreBluetooth framework中的 [centralManger scanForPeripheralsWithServices: ] method)
我們再用NSTimer啓動一個計時器, 五秒後會執行connectToBLETimer: 這個method
(設定repeat為NO, 表示只在按下按鈕後才執行), 最後再叫indicator在畫面上旋轉
再來看ConnectBLETimer:內的method
這邊的意思就是
五秒到以後, 先叫indicator 停止旋轉的動畫
如果有外部設備連接時, 用BLE class內的connectPeripheral: 進行連接
並且把button的按鈕標題設定為Disconnect,
相反, 如果沒找到時, 就直接顯示為Connect即可
#pragma mark - UITexfield Delegate
- (BOOL)textFieldShouldClear:(UITextField *)textField
{
return YES;
}
- (BOOL)textFieldShouldEndEditing:(UITextField *)aTextField
{
return YES;
}
- (BOOL)textFieldShouldReturn:(UITextField *)aTextField
{
// Send Data
NSString *sendString;
if (aTextField.text.length > 16) {
sendString = [aTextField.text substringToIndex:16];
} else {
sendString = aTextField.text;
}
sendString = [NSString stringWithFormat:@"%@\r\n", sendString];
NSData *sendData = [sendString dataUsingEncoding:NSUTF8StringEncoding];
[bleShield write:sendData];
aTextField.text = @"";
[aTextField resignFirstResponder];
return YES;
}
這邊我們是對TextField 的委派事件作處理
前兩個method代表以下兩個意思
1. textfield在輸入完成會清除
2. textfield結束編輯
3. 第三個代表的意思是, 按下return的按鈕後會對外部設備送出去字串的內容
這邊我們的ble shield 設定了字串最多長度只能16個字母
超過的話會由iOS端截掉後面的字元
送出時也包含了\r\n進行換行等動作
最後因為寫入到外部設備時, 只能用NSData的方式送出
(其實也可以用char *等比較low-level的C function, 但此處我們不多談細節)
在呼叫bleShield的write: method便可以把字串傳輸給外部設備了喔!
最後用再按下return後, 用resignFirstResponder把小鍵盤退出畫面就可以了!
#pragma mark - BLE Delegate
- (void)bleDidUpdateRSSI:(NSNumber *)rssi
{
[rssiLabel setText:[rssi stringValue]];
}
- (void)bleDidReceiveData:(unsigned char *)data length:(int)length
{
NSData *receiveData = [NSData dataWithBytes:data length:length];
NSString *decodeString = [[NSString alloc] initWithData:receiveData encoding:NSUTF8StringEncoding];
NSLog(@"Hey we recevie %@", decodeString);
receiveTextView.text = decodeString;
}
- (void)bleDidConnect
{
NSLog(@"Connect Successfully");
}
- (void)bleDidDisconnect
{
[connectButton setTitle:@"Connect" forState:UIControlStateNormal];
}
這邊我們發現RedBear Lab很貼心的為我們實作了最簡單的4個狀態
UpdateRSSI -> 收到RSSI 強度
DidReceiveData: length: - > 確實收到來自外部設備的資料, 以unsigned char為資料格式
DidConnect - > 確實與外部設備成功連結上的狀態
DidDisconnect - >確實與外部設備斷開連結的狀態
到這邊我們就完全完成所有的行為了!!!
接下來就是我們的Demo了, 順利執行程式後各位應該會看到以下畫面..
UpdateRSSI -> 收到RSSI 強度
DidReceiveData: length: - > 確實收到來自外部設備的資料, 以unsigned char為資料格式
DidConnect - > 確實與外部設備成功連結上的狀態
DidDisconnect - >確實與外部設備斷開連結的狀態
到這邊我們就完全完成所有的行為了!!!
接下來就是我們的Demo了, 順利執行程式後各位應該會看到以下畫面..
首先upload 已經寫好的arduino bluetooth code, 打開Serial Monitor (設定同之前)
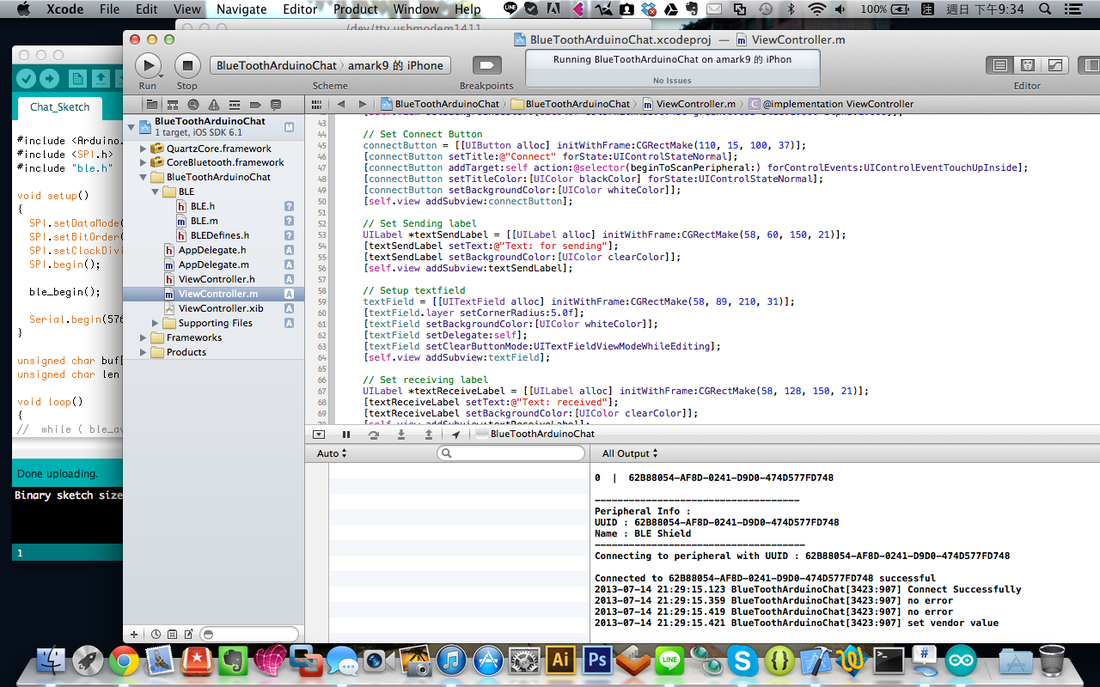
打開Xcode, 一樣把檔案compile到手機內, 按下connect的按鈕後
會跟上圖一樣, 右下角可以收到類似以下的資訊:
didDiscoverPeripheral
Stopped Scanning
Known peripherals : 1
List of currently known peripherals :
0 | 62B88054-AF8D-0241-D9D0-474D577FD748
------------------------------------
Peripheral Info :
UUID : 62B88054-AF8D-0241-D9D0-474D577FD748
Name : BLE Shield
-------------------------------------
Connecting to peripheral with UUID : 62B88054-AF8D-0241-D9D0-474D577FD748
這邊就可以讓你知道你連結上的外部機器有多少台, 以及相關的資訊 (包含UUID, 機器名稱等)
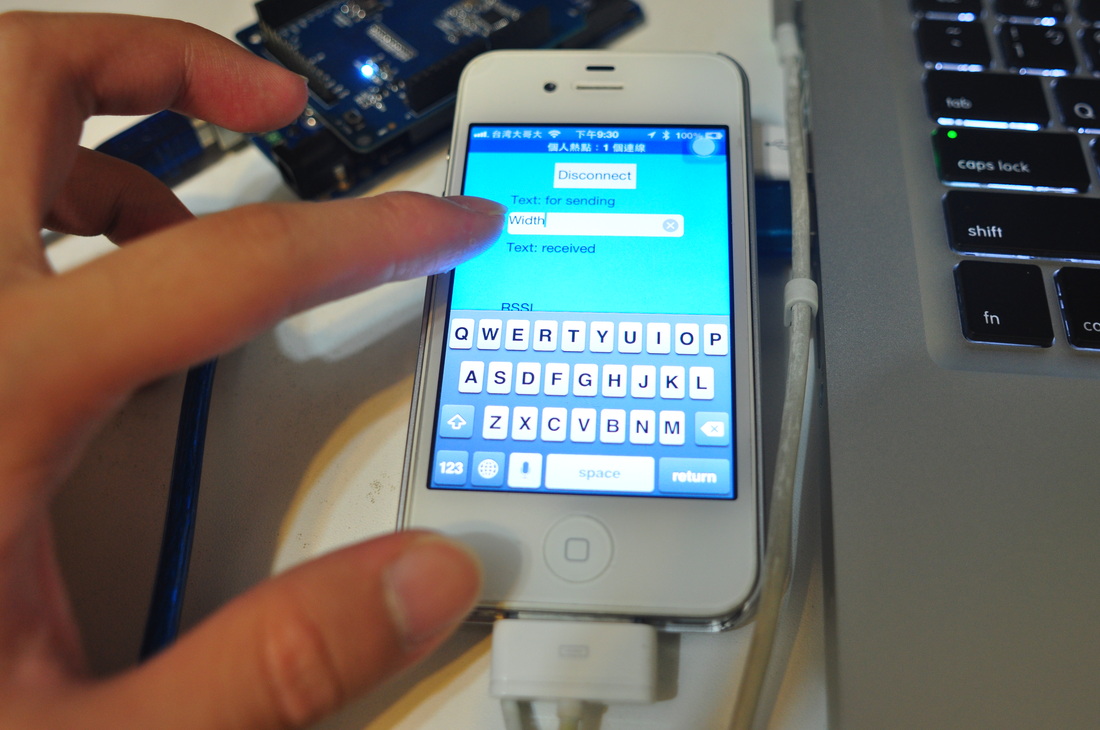
這邊我們先從app 內輸入一個 Width的字
然後就會看到Xcode的output有以下的字樣
Connected to 62B88054-AF8D-0241-D9D0-474D577FD748 successful
2013-07-14 21:29:15.123 BlueToothArduinoChat[3423:907] Connect Successfully
2013-07-14 21:29:15.359 BlueToothArduinoChat[3423:907] no error
2013-07-14 21:29:15.419 BlueToothArduinoChat[3423:907] no error
2013-07-14 21:29:15.421 BlueToothArduinoChat[3423:907] set vendor value
2013-07-14 21:30:07.350 BlueToothArduinoChat[3423:907] no error
2013-07-14 21:30:07.351 BlueToothArduinoChat[3423:907] receive data
2013-07-14 21:30:07.353 BlueToothArduinoChat[3423:907] Hey we recevie Width
顯示我們收到了 Width 這個字, 這時我們看一下Serial Monitor 可以看到以下畫面
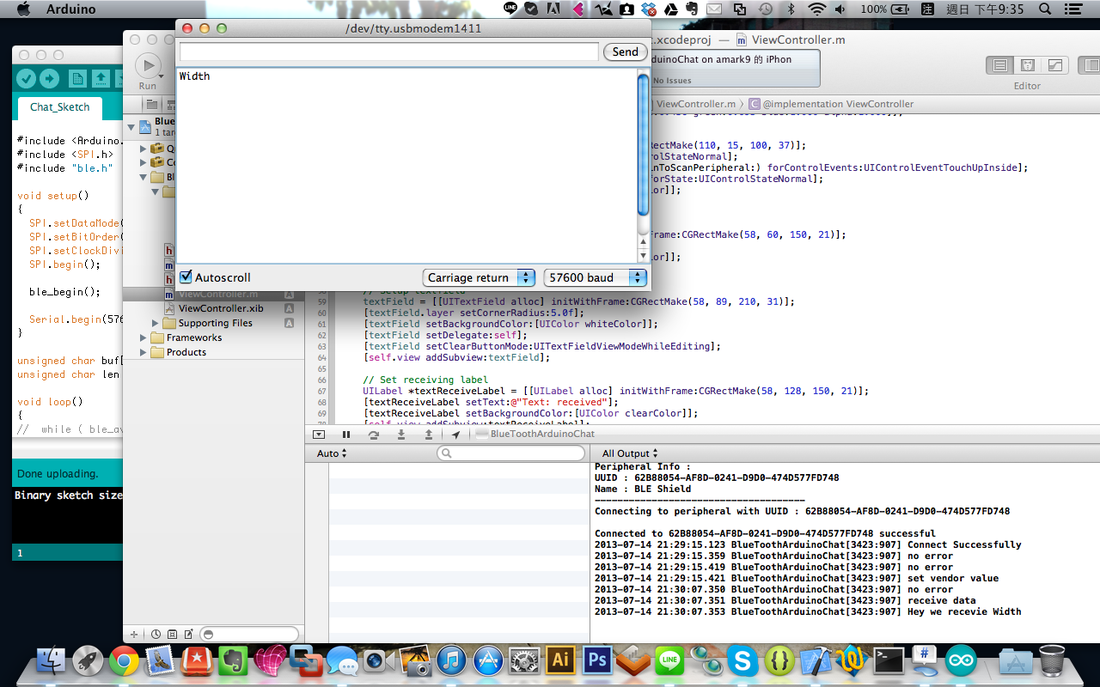
這裡就能看到Serial Monitor顯示出來, Arduino確實收到了Width這個的字樣!
到這邊我們算是整個app都完成了
對操作過程有疑問的版友可以看以下我們錄製的影片!
到這邊我們算是整個app都完成了
對操作過程有疑問的版友可以看以下我們錄製的影片!
影片拍得有點不清楚
不過概念上就是這些流程!!
有興趣的朋友可以到這裡來下載:
BLE iOS FrameWork 下載請點這裡
本次教學完整下載請點這裡
藍芽聊天室互動的部分到這邊算是告一段落了!
各位板友有興趣的話請繼續關注TakoBear!
我們將為大家帶來更多更有趣的DIY制作教學 以及更多有趣的八卦消息!
不過概念上就是這些流程!!
有興趣的朋友可以到這裡來下載:
BLE iOS FrameWork 下載請點這裡
本次教學完整下載請點這裡
藍芽聊天室互動的部分到這邊算是告一段落了!
各位板友有興趣的話請繼續關注TakoBear!
我們將為大家帶來更多更有趣的DIY制作教學 以及更多有趣的八卦消息!
 RSS Feed
