各位版友好,繼上次的 動手做自己的智能家電系列獲得好評後
這次TakoBear又要來放上新的智能家電功能開發了!
今天的主題是:複製一份家裡的遙控器!
概念是像這樣的
發送家裡遙控器的紅外線編碼 → Arduino 紀錄內容 → Arduino 發送紅外線編碼出去
.....
好吧小編知道這樣講似乎太簡單了...
接下來就請各位買好消夜拿著你的板子,放上一首喜歡的音樂
正式進入教學區!
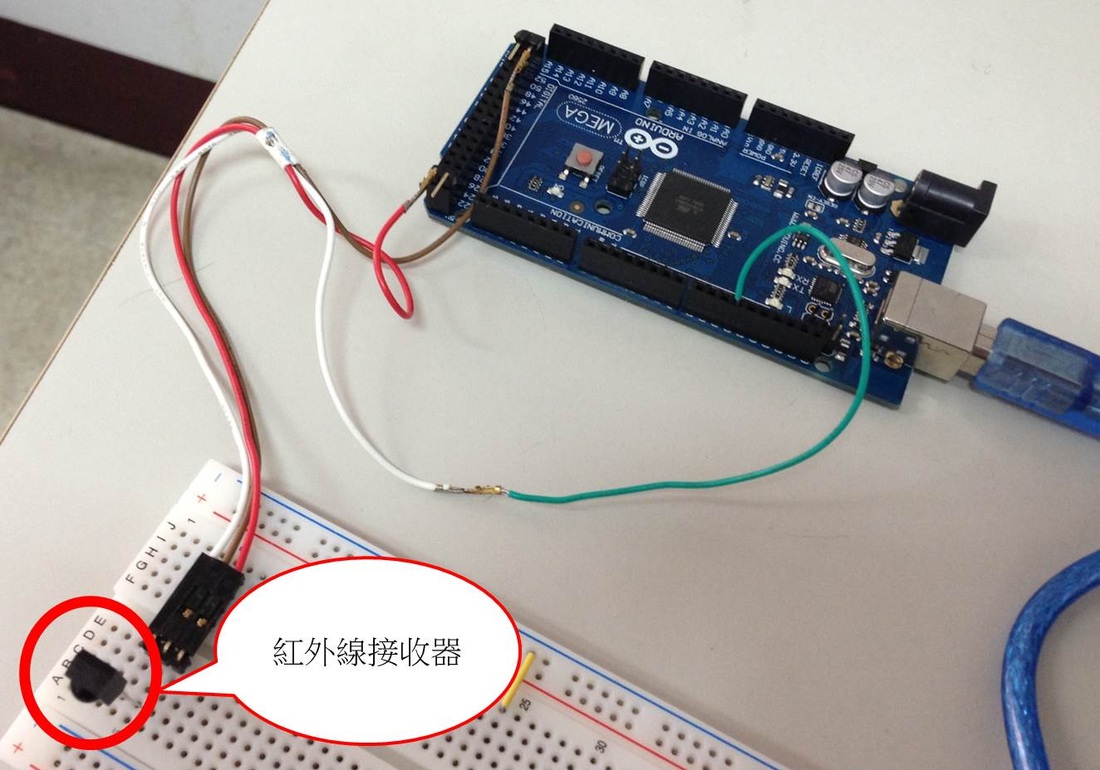
首先開始前,我們必須要收集材料如下圖:
這次TakoBear又要來放上新的智能家電功能開發了!
今天的主題是:複製一份家裡的遙控器!
概念是像這樣的
發送家裡遙控器的紅外線編碼 → Arduino 紀錄內容 → Arduino 發送紅外線編碼出去
.....
好吧小編知道這樣講似乎太簡單了...
接下來就請各位買好消夜拿著你的板子,放上一首喜歡的音樂
正式進入教學區!
首先開始前,我們必須要收集材料如下圖:
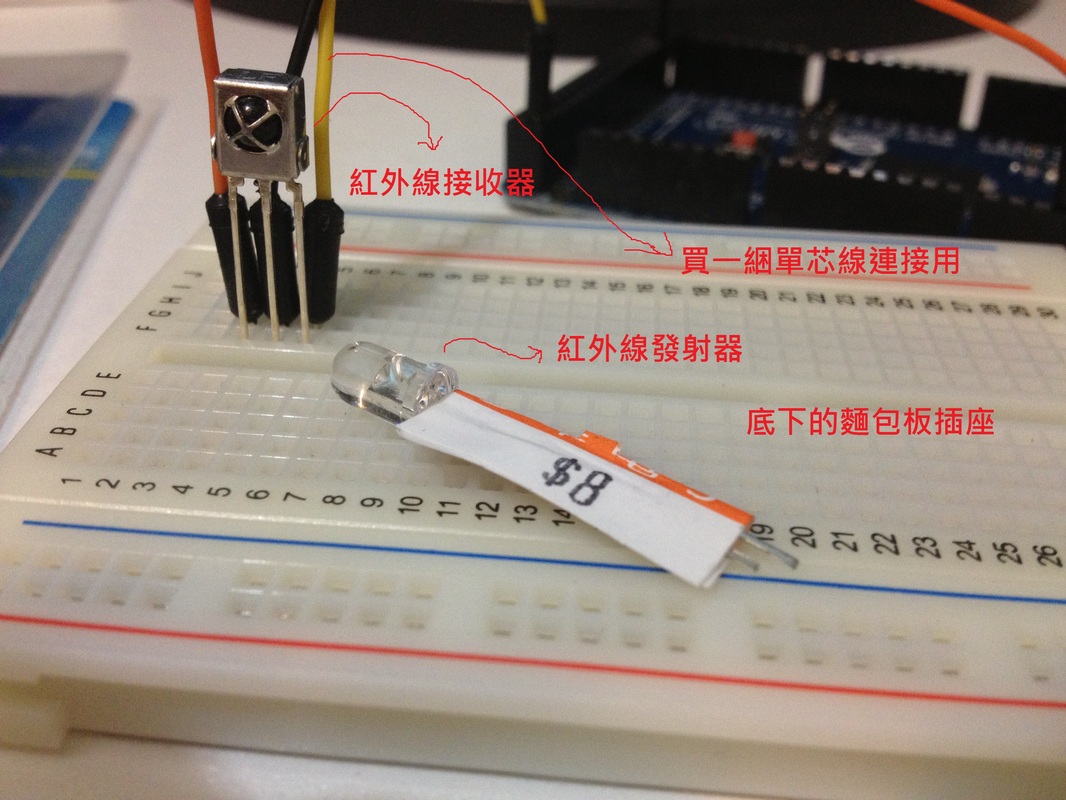
我們需要的材料就是:
1個紅外線發射器 (39kHz 上下,約莫30塊台幣)
1個紅外線接收器 (940nm)
1塊麵包板
1捆單芯線
跟你不能少的一塊Arduion板子,這邊小編用的是Atmega 2560喔~
(關於如何驅動他的方法可以參考動手做自己的智能家電系列,需要購買他的朋友就到露天拍賣找囉!)
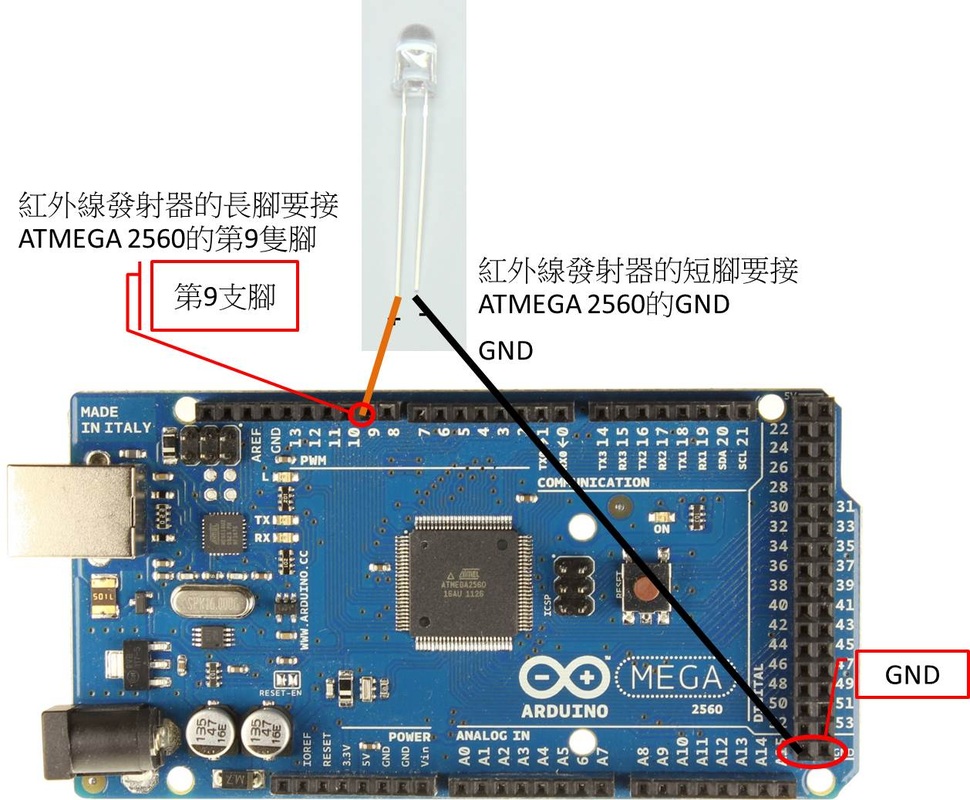
接下來我們就要把他接起來啦!
別擔心你不會電路學,因為小編也不會(誤)
1個紅外線發射器 (39kHz 上下,約莫30塊台幣)
1個紅外線接收器 (940nm)
1塊麵包板
1捆單芯線
跟你不能少的一塊Arduion板子,這邊小編用的是Atmega 2560喔~
(關於如何驅動他的方法可以參考動手做自己的智能家電系列,需要購買他的朋友就到露天拍賣找囉!)
接下來我們就要把他接起來啦!
別擔心你不會電路學,因為小編也不會(誤)
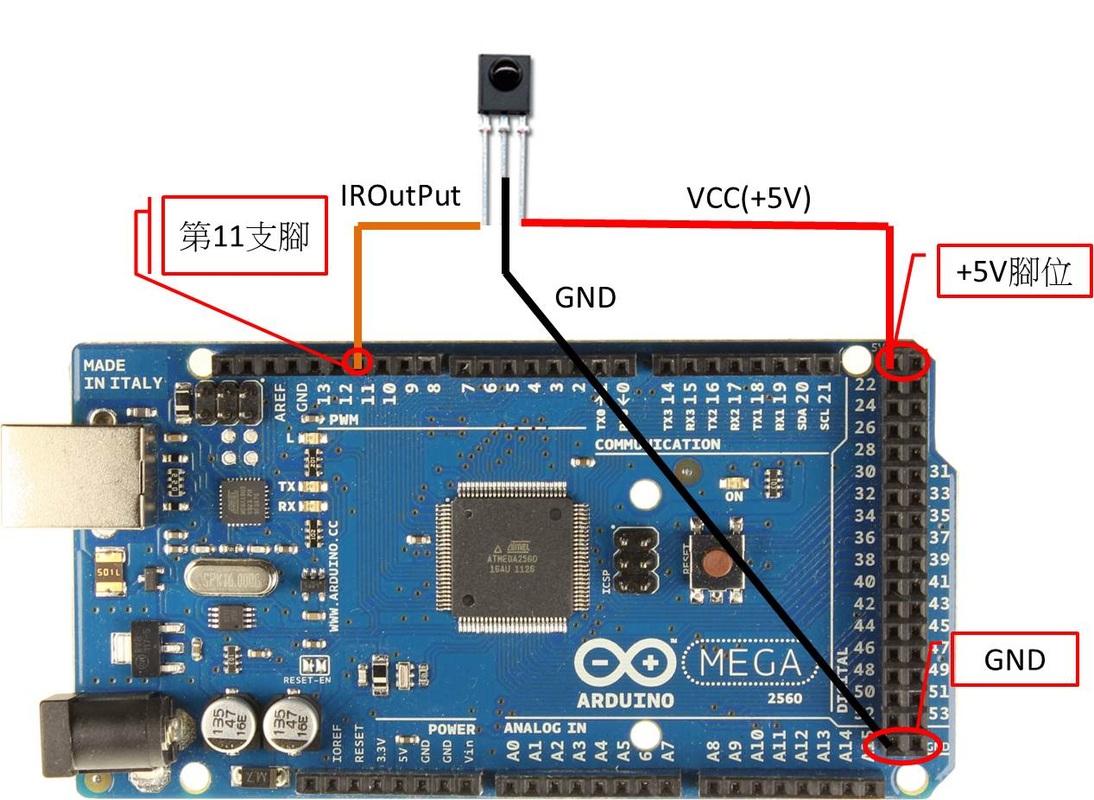
基本上的概念圖是這樣,不過你們也可能會有腳位位置相反!
如果之後下載程式碼,按照上圖安裝電路卻不能執行時,
那很有可能是你的線路插反了!!!
因為每間廠商的紅外線接收器可能略有不同,插反電路這種事也是十分有可能的
這時候只要參考下圖就能解決囉
如果之後下載程式碼,按照上圖安裝電路卻不能執行時,
那很有可能是你的線路插反了!!!
因為每間廠商的紅外線接收器可能略有不同,插反電路這種事也是十分有可能的
這時候只要參考下圖就能解決囉
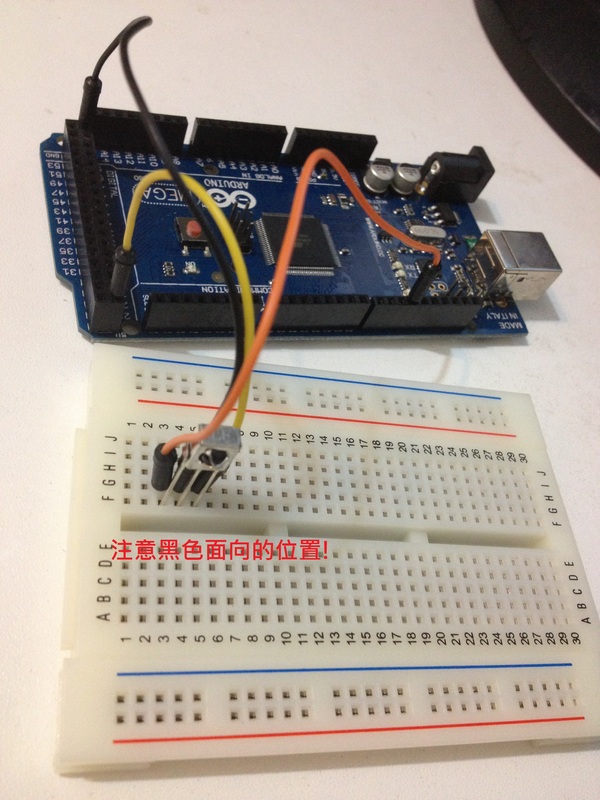
或是也可以像小編的朋友安裝成底下的方式!
接下來呢,請大家準備一個家裡的紅外線遙控器
冷氣或是電視的遙控器都行喔!
這邊小編介紹兩種不同遙控器的會有甚麼影響
冷氣或是電視的遙控器都行喔!
這邊小編介紹兩種不同遙控器的會有甚麼影響
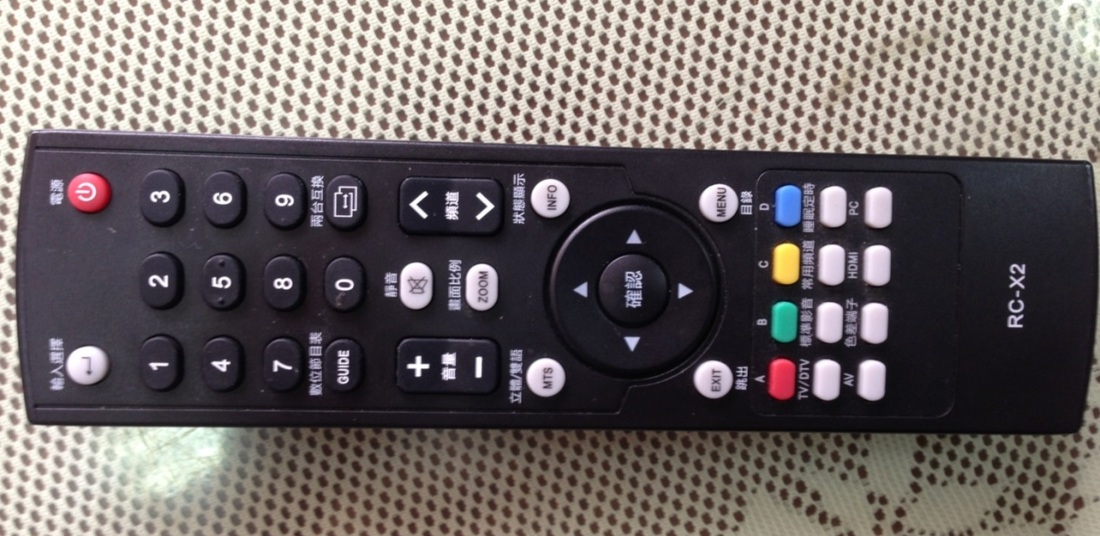
這是隻SAMPO電視的遙控器
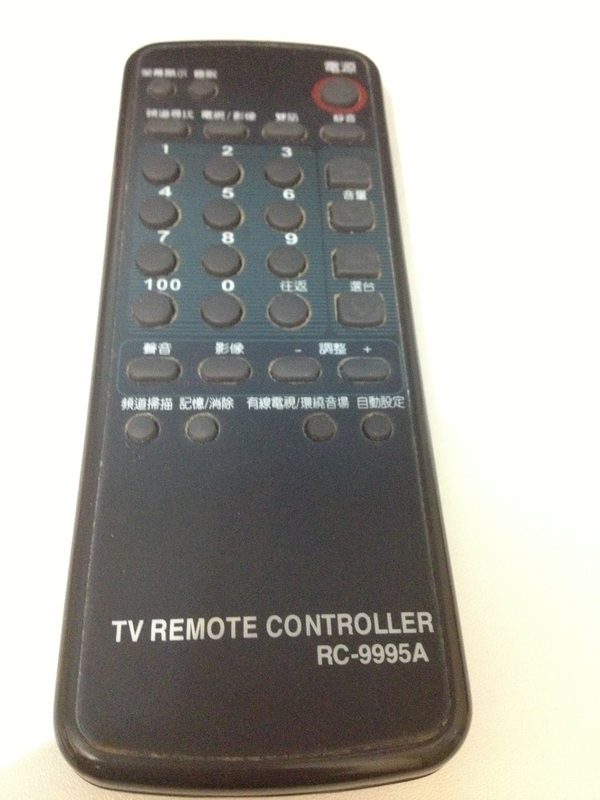
這是隻萬用電視遙控器
我們這邊先不細談兩支遙控器廠牌差異有什麼影響
接下來請大家到這個網址: https://github.com/shirriff/Arduino-IRremote
下載一份Open Source程式碼
我們這邊先不細談兩支遙控器廠牌差異有什麼影響
接下來請大家到這個網址: https://github.com/shirriff/Arduino-IRremote
下載一份Open Source程式碼
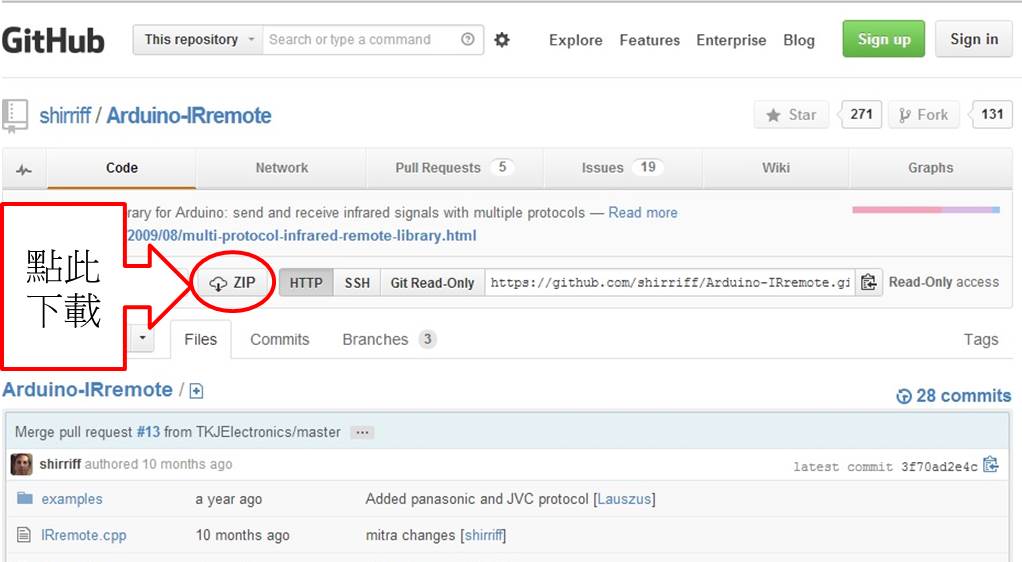
順帶一提,GitHub上有非常多國內外的高手分享Open Source程式碼,為軟體產業做了相當多傑出的貢獻
讓我們在這邊默默為他們鼓掌(拍手)
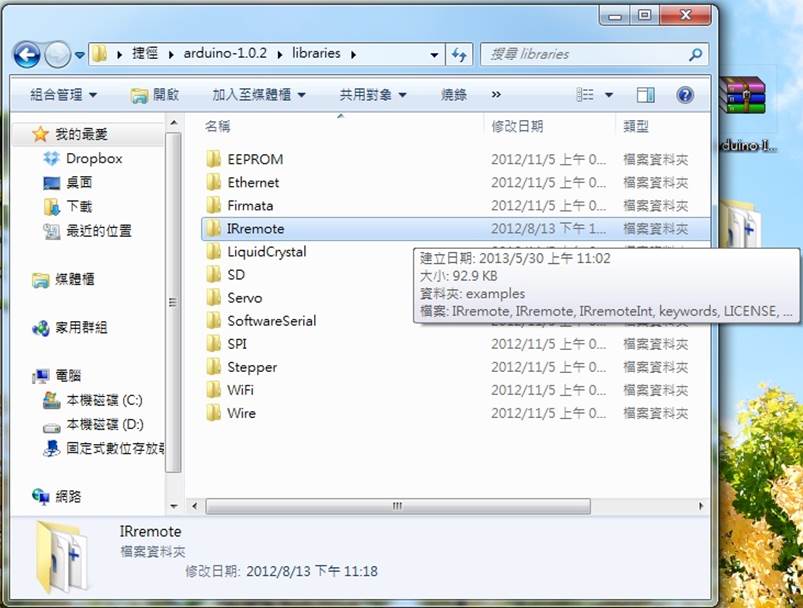
接下來把下載下來的檔案放在我們之前解壓縮的arduino資料夾(不知道的可以看動手做自己的智能家電系列)
讓我們在這邊默默為他們鼓掌(拍手)
接下來把下載下來的檔案放在我們之前解壓縮的arduino資料夾(不知道的可以看動手做自己的智能家電系列)
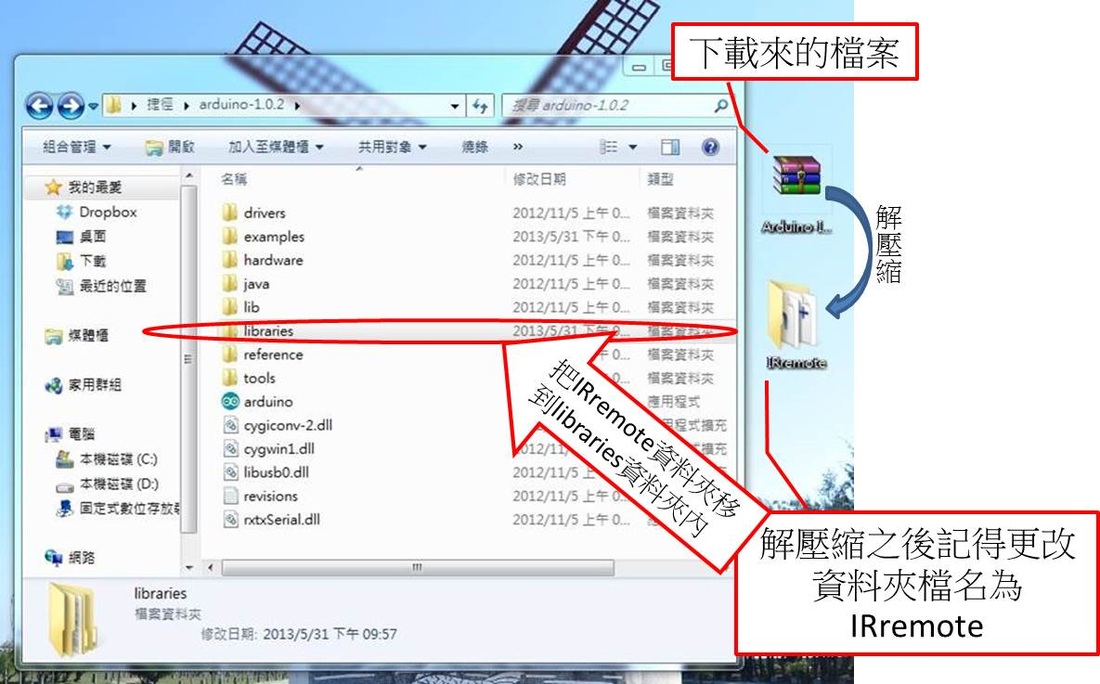
這樣就能在原本的Arduino中增加新的函式庫囉
到這邊就能正式進入本篇的正題了!
完成這些準備工作後,
我們首先要做的是:
1. 錄製遙控器紅外線訊號
這裡有我們已經寫好的code,先建立一個檔案叫做IRRecordforUnknownRC.ino吧
完成這些準備工作後,
我們首先要做的是:
1. 錄製遙控器紅外線訊號
這裡有我們已經寫好的code,先建立一個檔案叫做IRRecordforUnknownRC.ino吧
#include <IRremote.h>
int RECV_PIN = 11;
IRrecv irrecv(RECV_PIN);
decode_results results;
void setup()
{
Serial.begin(9600);
irrecv.enableIRIn(); // Start the receiver
}
void dump(decode_results *results) {
int count = results->rawlen;
if (results->decode_type == UNKNOWN) {
Serial.print("Unknown encoding: ");
}
else if (results->decode_type == NEC) {
Serial.print("Decoded NEC: ");
}
else if (results->decode_type == SONY) {
Serial.print("Decoded SONY: ");
}
else if (results->decode_type == RC5) {
Serial.print("Decoded RC5: ");
}
else if (results->decode_type == RC6) {
Serial.print("Decoded RC6: ");
}
else if (results->decode_type == PANASONIC) {
Serial.print("Decoded PANASONIC - Address: ");
Serial.print(results->panasonicAddress,HEX);
Serial.print(" Value: ");
}
else if (results->decode_type == JVC) {
Serial.print("Decoded JVC: ");
}
Serial.print(results->value, HEX);
Serial.print(" (");
Serial.print(results->bits, DEC);
Serial.println(" bits)");
Serial.print("unsigned int YourVariableName [");
Serial.print(count-1, DEC);
Serial.print("]={");
for (int i = 1; i < count; i++) {//ingore data of i=0
if ((i % 2) == 1) {
Serial.print(results->rawbuf[i]*USECPERTICK, DEC);
}
else {
Serial.print(abs(-(int)results->rawbuf[i]*USECPERTICK), DEC);
}
if(i<count-1){
Serial.print(",");
}
}
Serial.println("};");
}
void loop() {
if (irrecv.decode(&results)) {
Serial.println(results.value, HEX);
dump(&results);
irrecv.resume(); // Receive the next value
}
}
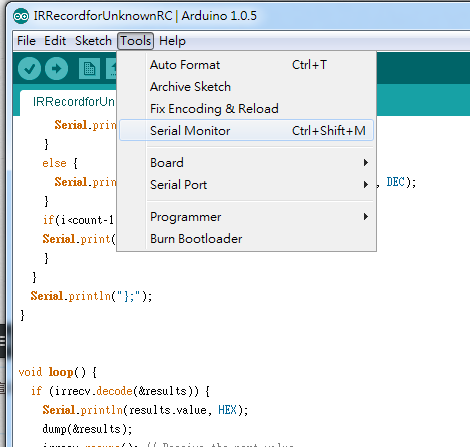
開始Upload!
Upload以後,我們先拿萬用遙控器,對著紅外線接收器做這件事....
Upload以後,我們先拿萬用遙控器,對著紅外線接收器做這件事....
這時候我們看到Serial Monitor可以看到以下畫面
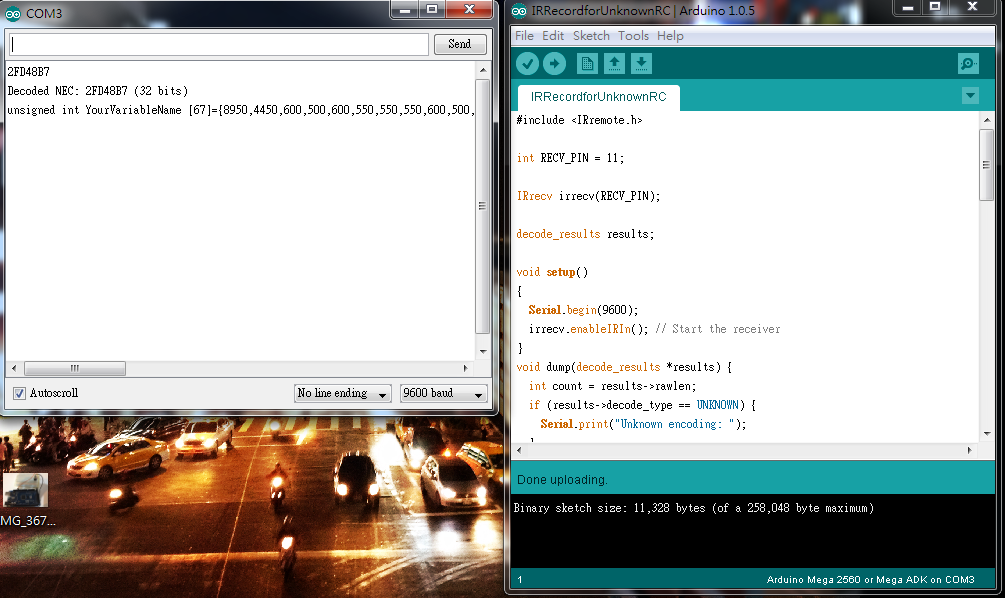
左邊就是我們看到的成果!
這邊可以發現我們的萬用遙控器是NEC編碼,所以馬上我們就能把我們的編碼記錄起來
2FD48B7 , 32bits 我們只須要記得這一段就好
接下來創一個發射訊號的檔案IRSendSig.ino
這邊可以發現我們的萬用遙控器是NEC編碼,所以馬上我們就能把我們的編碼記錄起來
2FD48B7 , 32bits 我們只須要記得這一段就好
接下來創一個發射訊號的檔案IRSendSig.ino
#include <IRremote.h>
IRsend irsend;
void setup()
{
Serial.begin(9600);
}
void loop() {
if(Serial.available()>0){
irsend.sendNEC(0x2FD48B7, 32); //這邊要加上0x !
delay(10000);
}
}
IRsend irsend;
void setup()
{
Serial.begin(9600);
}
void loop() {
if(Serial.available()>0){
irsend.sendNEC(0x2FD48B7, 32); //這邊要加上0x !
delay(10000);
}
}
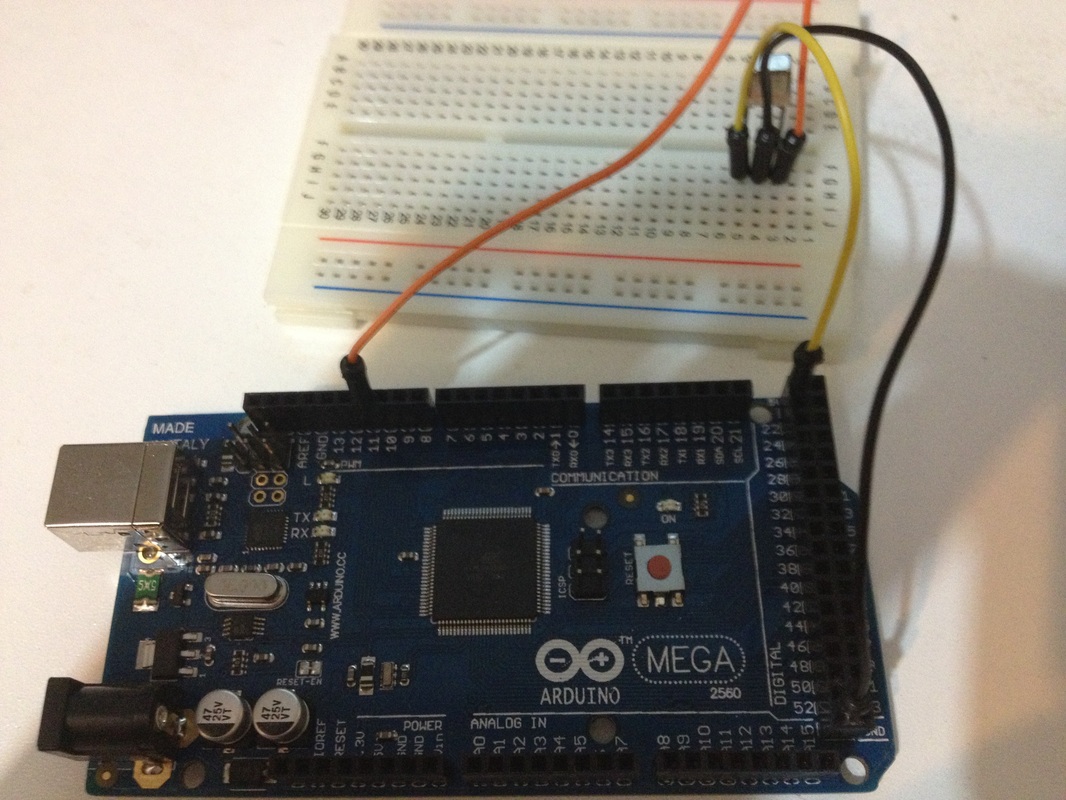
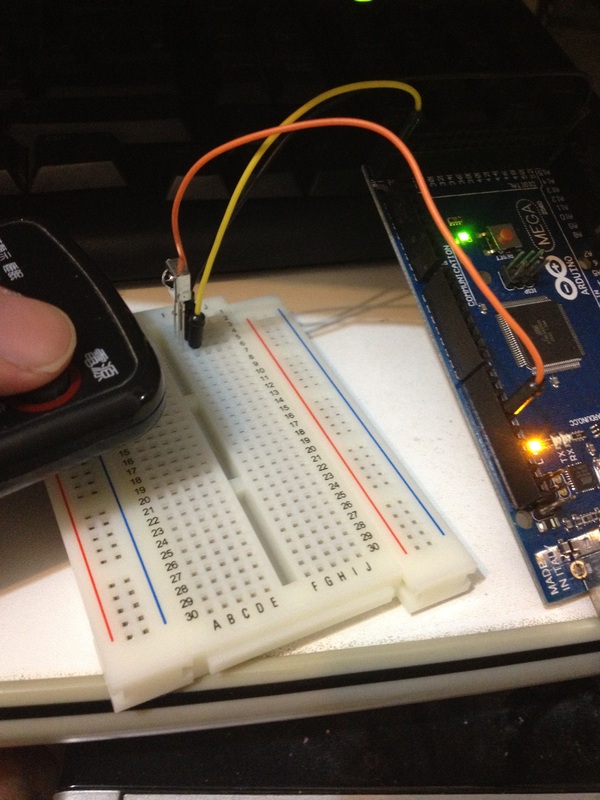
至於我們發射腳位的排法就看下面這張圖囉!
這裡接好以後,Upload IRSendSig.ino 的程式碼後
開啟Serial Monitor, 隨便打些字,對準你的電視機就能讓他開啟或關閉囉!
注意事項
如果有人跟小編之前一樣,電路都正確卻依然開不了
實驗距離2~3m是沒問題的,請注意務必要對準接收端
另外一點是,有人如果跟小編第一次弄時一樣...全都正確了卻仍然沒法讓電視開關
試試看將你的紅外線發射器長短腳換位子,可能就能解決你的問題了
雖然這種機率十分低,不過仍不失為一個方法...
接下來我們來談另外一種遙控器情況,如果你收到的畫面是以下畫面
開啟Serial Monitor, 隨便打些字,對準你的電視機就能讓他開啟或關閉囉!
注意事項
如果有人跟小編之前一樣,電路都正確卻依然開不了
實驗距離2~3m是沒問題的,請注意務必要對準接收端
另外一點是,有人如果跟小編第一次弄時一樣...全都正確了卻仍然沒法讓電視開關
試試看將你的紅外線發射器長短腳換位子,可能就能解決你的問題了
雖然這種機率十分低,不過仍不失為一個方法...
接下來我們來談另外一種遙控器情況,如果你收到的畫面是以下畫面
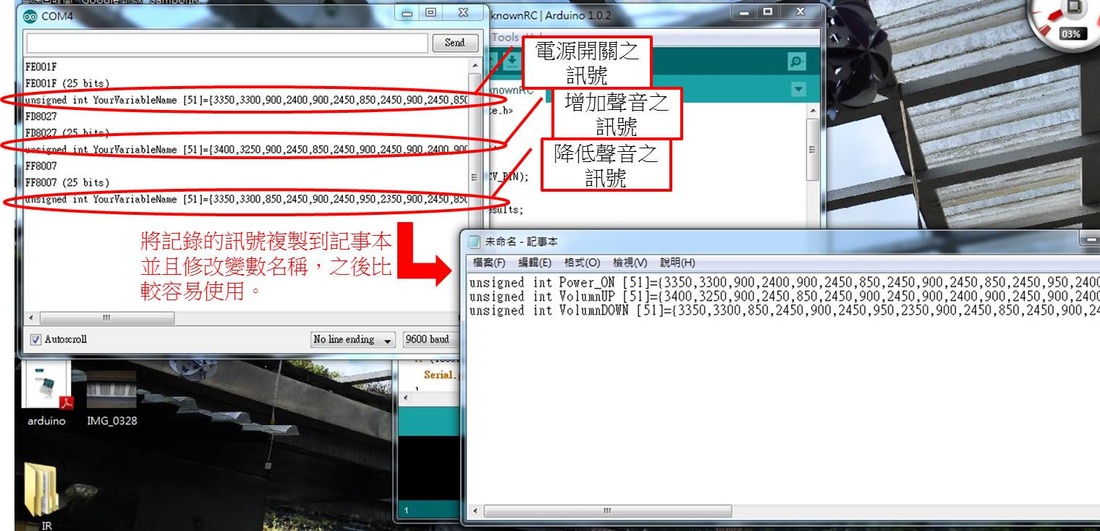
這種情況代表你的遙控器編碼並沒有被記錄在裡面!不過別擔心
IRremote的模組已經幫你都處理好了,如果無法辨識這樣的編碼,就只要用
irsend.sendRaw() 這個函數幫你處理就好!
這時候我們只要把IRSendSig.ino的程式碼改成下面這樣就行了!
其他過程完全一樣!
IRremote的模組已經幫你都處理好了,如果無法辨識這樣的編碼,就只要用
irsend.sendRaw() 這個函數幫你處理就好!
這時候我們只要把IRSendSig.ino的程式碼改成下面這樣就行了!
其他過程完全一樣!
#include <IRremote.h>
IRsend irsend;
unsigned int Power_ON [51]={3350,3300,900,2400,900,2450,850,2450,900,2450,850,2450,950,2400,850,2450,900,800,850,800,850,800,950,750,900,750,950,700,950,750,900,750,950,700,950,750,850,800,950,700,900,2450,850,2450,900,2450,900,2400,950,2250,600};
unsigned int VolumnUP [51]={3400,3250,900,2450,850,2450,900,2450,900,2400,900,2450,900,2400,900,800,900,2400,900,2400,950,750,900,750,900,750,950,750,900,750,900,750,900,800,900,750,900,750,950,2400,900,750,900,800,900,2400,900,2450,850,2300,650};
unsigned int VolumnDOWN [51]={3350,3300,850,2450,900,2450,950,2350,900,2450,850,2450,900,2450,850,2450,900,2450,850,2450,900,800,900,750,850,800,900,750,900,800,950,750,850,800,900,750,850,800,900,750,950,750,850,800,900,2450,850,2500,850,2300,650};
void setup()
{
Serial.begin(9600);
}
void loop() {
if(Serial.available()>0)
{
int IRact=Serial.read();
IRact=IRact-48;
switch(IRact)
{
case 1:
irsend.sendRaw(Power_ON, 51, 38);
delay(50);
break;
case 2:
irsend.sendRaw(VolumnUP, 51, 38);
delay(50);
break;
case 3:
irsend.sendRaw(VolumnDOWN, 51, 38);
delay(50);
break;
}
}
}
看到這邊還有問題的朋友可以到這裡下載原始碼: http://www.4shared.com/rar/dhMejbYB/IRCode.html?
有任何問題,歡迎聯絡TakoBear!
我們的gmail: [email protected]
 RSS Feed
